Stock Predictor using 1D Convolutional Nueral Network.
Convolutional neural networks, also called ConvNets, were first introduced in the 1980s by Yann LeCun, a postdoctoral computer science researcher. Till then Machine Learing has come a long way. In 2019 while reading a article on 2D CNN I came across 1D CNN and it's useage in Time Series Data Manuplation. This caught my attention since CNN is specifically designed to process pixel data and used in image recognition and processing and it looked like a interesting challenge.
This application is frontend only so there is no need for backserver. And by using Tensorflow.js it is easy to implement the 1D CNN. For code click on the GitHub link in nav.
All the work that need to be done can be set up in 6 steps:
- Get the Data
- Generate Features
- Generate Ml Model
- Train the ML Model
- Test the ML Model
- Predict with Ml Modle
Get the Data
Here I have used API form IEX. In this application I'm are using the chart endpoint which has predifined historical period. You can chose chart form 6 month to 5 year.
url = "https://cloud.iexapis.com/stable/stock/"+symbol+"/chart/"+chart_time+"?token="+token;
The result from this API is json array with historical data for the requested company. Below is some example from the response data.
                [
                ...
                {
                    "date":"2018-02-20",
                    "open":169.4694,
                    "high":171.6463,
                    "low":168.8489,
                    "close":169.2724,
                    "volume":33930540,
                    "unadjustedVolume":33930540,
                    "change":-0.5713,
                    "changePercent":-0.336,
                    "vwap":170.3546,
                    "label":"Feb 20, 18",
                    "changeOverTime":0
                },
                ...
                ]
Generate Features
After the data is retrieved we need to process it and prepare the feature set and label set. While I was reading reserach paper, mostly I found paper where they were using date field as feature. But there was a article where the person divide the timeStamp into window and feed that data as feature. So I ended up using 7 feature for my test set and each one of them is leabeled with the stock price for the next day. The reason was Firstly, the date is all ways incressing. Secondly, date are independent of stock price.
            ...
            // timePortion = 7  define the window for the feature to genrate
            for(let i = timePortion; i < size; i++){
                for( let j = (i - timePortion); j < i; j++){
                        trainX.push(SFeature[j]);
                }
                trainY.push(SFeature[i]);
            }
            ...
Here SFeature is normalised data which is normalised using normalization function in utility.js file. Normalization will cale all the values between 0 and 1. This is important so the prediction model better fit our model and to be faster when there is a lot of data. The trainX is Flat array of values but as 1D CNN take two dimensional data we have to reshape it to matrix with format: [number_of_samples - 7, number_of_features]. Here I am taking number_of_samples - 7 because, I am using data of previous 7 days to form feature for the next day.
Generate ML Model
Next step is creating the CNN model. This is done by CNN_build function in script.js file. This step is really simplified using the Tensorflow library. What we need to do is define sequential (linear stack of layers) tensorflow model and then add the predefined layers in order to build our CNN model.
What is Convolutional Neural Netwrok?
CNN or Convolutional Neural Network is a class of deep neural networks, most commonly applied to analyzing visual imagery. That’s why using it for predicting stock price is unusual and interesting challenge. The CNN has 4 important type of layers that makes it different. These are Convolution layer, ReLU layer, Pooling layer and Fully Connected Layer. Each of them has specific task to do.
We defined total of 7 layers:
- inputLayer — has input size [7, 1] because we have 7 features
- conv1d— First convolutional layer
- averagePooling1d — First average pooling layer
- conv1d — Second convolutional layer
- averagePooling1d — Second pooling layer
- flatten — Reduce the dimension, reshape input to [number of samples, number of features]
- dense — Fully connected layer using linear activation function with 1 unit which returns 1 output value
Code Below
            ...
            const buildCnn = function (data) {
                return new Promise(function (resolve, reject) {

                    // Linear (sequential) stack of layers
                    const model = tf.sequential();

                    // Define input layer
                    model.add(tf.layers.inputLayer({
                        inputShape: [7, 1],
                    }));

                    // Add the first convolutional layer
                    model.add(tf.layers.conv1d({
                        kernelSize: 2,
                        filters: 128,
                        strides: 1,
                        use_bias: true,
                        activation: 'relu',
                        kernelInitializer: 'VarianceScaling'
                    }));

                    // Add the Average Pooling layer
                    model.add(tf.layers.averagePooling1d({
                        poolSize: [2],
                        strides: [1]
                    }));

                    // Add the second convolutional layer
                    model.add(tf.layers.conv1d({
                        kernelSize: 2,
                        filters: 64,
                        strides: 1,
                        use_bias: true,
                        activation: 'relu',
                        kernelInitializer: 'VarianceScaling'
                    }));

                    // Add the Average Pooling layer
                    model.add(tf.layers.averagePooling1d({
                        poolSize: [2],
                        strides: [1]
                    }));

                    // Add Flatten layer, reshape input to (number of samples, number of features)
                    model.add(tf.layers.flatten({

                    }));

                    // Add Dense layer,
                    model.add(tf.layers.dense({
                        units: 1,
                        kernelInitializer: 'VarianceScaling',
                        activation: 'linear'
                    }));

                    return resolve({
                        'model': model,
                        'data': data
                    });
                });
            }
            ...
Train the ML Model
Now I have transform train and label sets into tensor data, since tensorflow works with it’s own type of data known as tensor(s).
This is pretty simple step. I create the tensors and reshape our features data into [number_of_samples, timePortion, 1]. timePortion is 7 in this case.
                ...
                let tensorData = {
                tensorTrainX:    tf.tensor1d(built.data.trainX).reshape([built.data.size, built.data.timePortion, 1]),
                tensorTrainY: tf.tensor1d(built.data.trainY)
                };
                ...
Now that I got our tensors we use them along with the model in cnn function. There, we first set up the optimization algorithm and the loss function. In the Application you get to chose between 'adam' and 'SGD (Stochastic Gradient descent)' type of optimizer but the best result is found with ' adam '. For loss I have used "meanSquaredError".
model.compile({ optimizer: ‘adam’, loss: ‘meanSquaredError’ });
Unlike SGD (scholastic gradient descent), Adam optimizer use different learning rate for each weight. Now call the fit function on the tensorflow model and send the trainX (features) ans trainY (labels) sets.
                ...
                // Train the model
                model.fit(data.tensorTrainX, data.tensorTrainY, {
                epochs: epochs
                }).then(fucntion (result) {
                ...
Here epoch refers to one cycle through the full training dataset. In this model epoch deafult value is 100.
Test the ML Model
In this step we already have our model prepared for making future predictions. What we will do first is use this model to predict on the same set that we trained our model. The idea behind this is that we can compare (visualize) how well our model fits the training set.
We create the prediction simply by calling predict function from the model.
var predictedX = model.predict(tensorData.tensorTrainX);
We get the predicted data by calling:
                predictedX.data().then(function (pred) {
                ...
And since we have previously normalized (scaled) our features we need to run inverse min-max operation in order to get the real feature values.
var predictedX_rev = rev_normalization(pred, min, max);
Plot the graph using plotly.js.
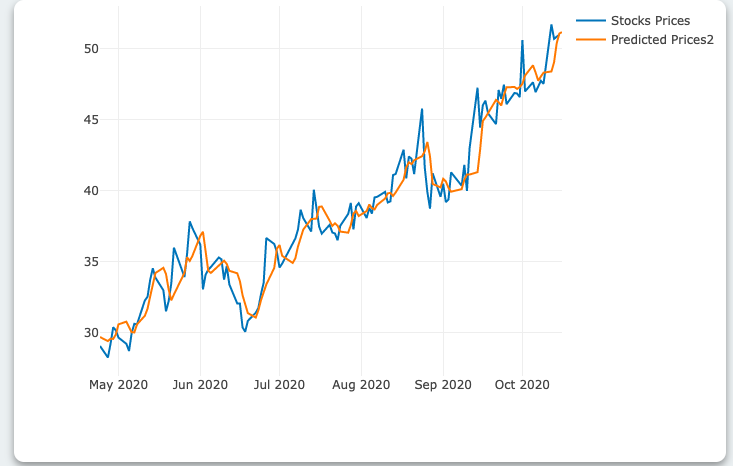
Actual vs Predict values for TWTR (Twitter 6 month)
Predict with ML Model
What’s left to do is generating the test features for making the next day stock price prediction.
                print("Generating Features.....")
                let NDP = prediction_generator(result.originalData, result.timePortion); // nextdayprediction
What this function does is pretty simple. It takes the last 7 stock price values from the given data and create the test feature set (for next day prediction). Then we repeat the same steps where we transform this data into tensor data and reshape it into [number_of_samples, number_of_features, 1] which in this case it will be [1, 7, 1] since we have only one test example.
Next, we call the predict function from our model.
let predictedValue = model.predict(next_prediction_tensor);
We get the predicted value and run inverse min-max normalization
                predictedValue.data().then(function (p_val) {

                    let predictedValue_rev = rev_normalization(p_val, min, max);


                    predictedX.data().then(function (pred) {

                        var predictedX_rev = rev_normalization(pred, min, max);


                        predictedX_rev.data = Array.prototype.slice.call(predictedX_rev.data);

                        predictedX_rev.data[predictedX_rev.data.length] = predictedValue_rev.data[0];
                .....